The Merriam-Webster dictionary defines “massacre” as “to kill on a large scale.” Although I originally wanted to name this post “How to Safely Eliminate Poison Hemlock,” I decided that honesty would make a more entertaining blog. As I most certainly did not eliminate the poison hemlock problem on my acreage, I must describe my efforts as how to “Safely Massacre Hemlock” instead.
This post will detail how to identify poison hemlock and how to kill poison hemlock. It will also suggest supplies for safe removal. Most importantly, perhaps, readers will be provided with numerous mistakes in hemlock elimination that can easily be avoided.

What is Poison Hemlock?

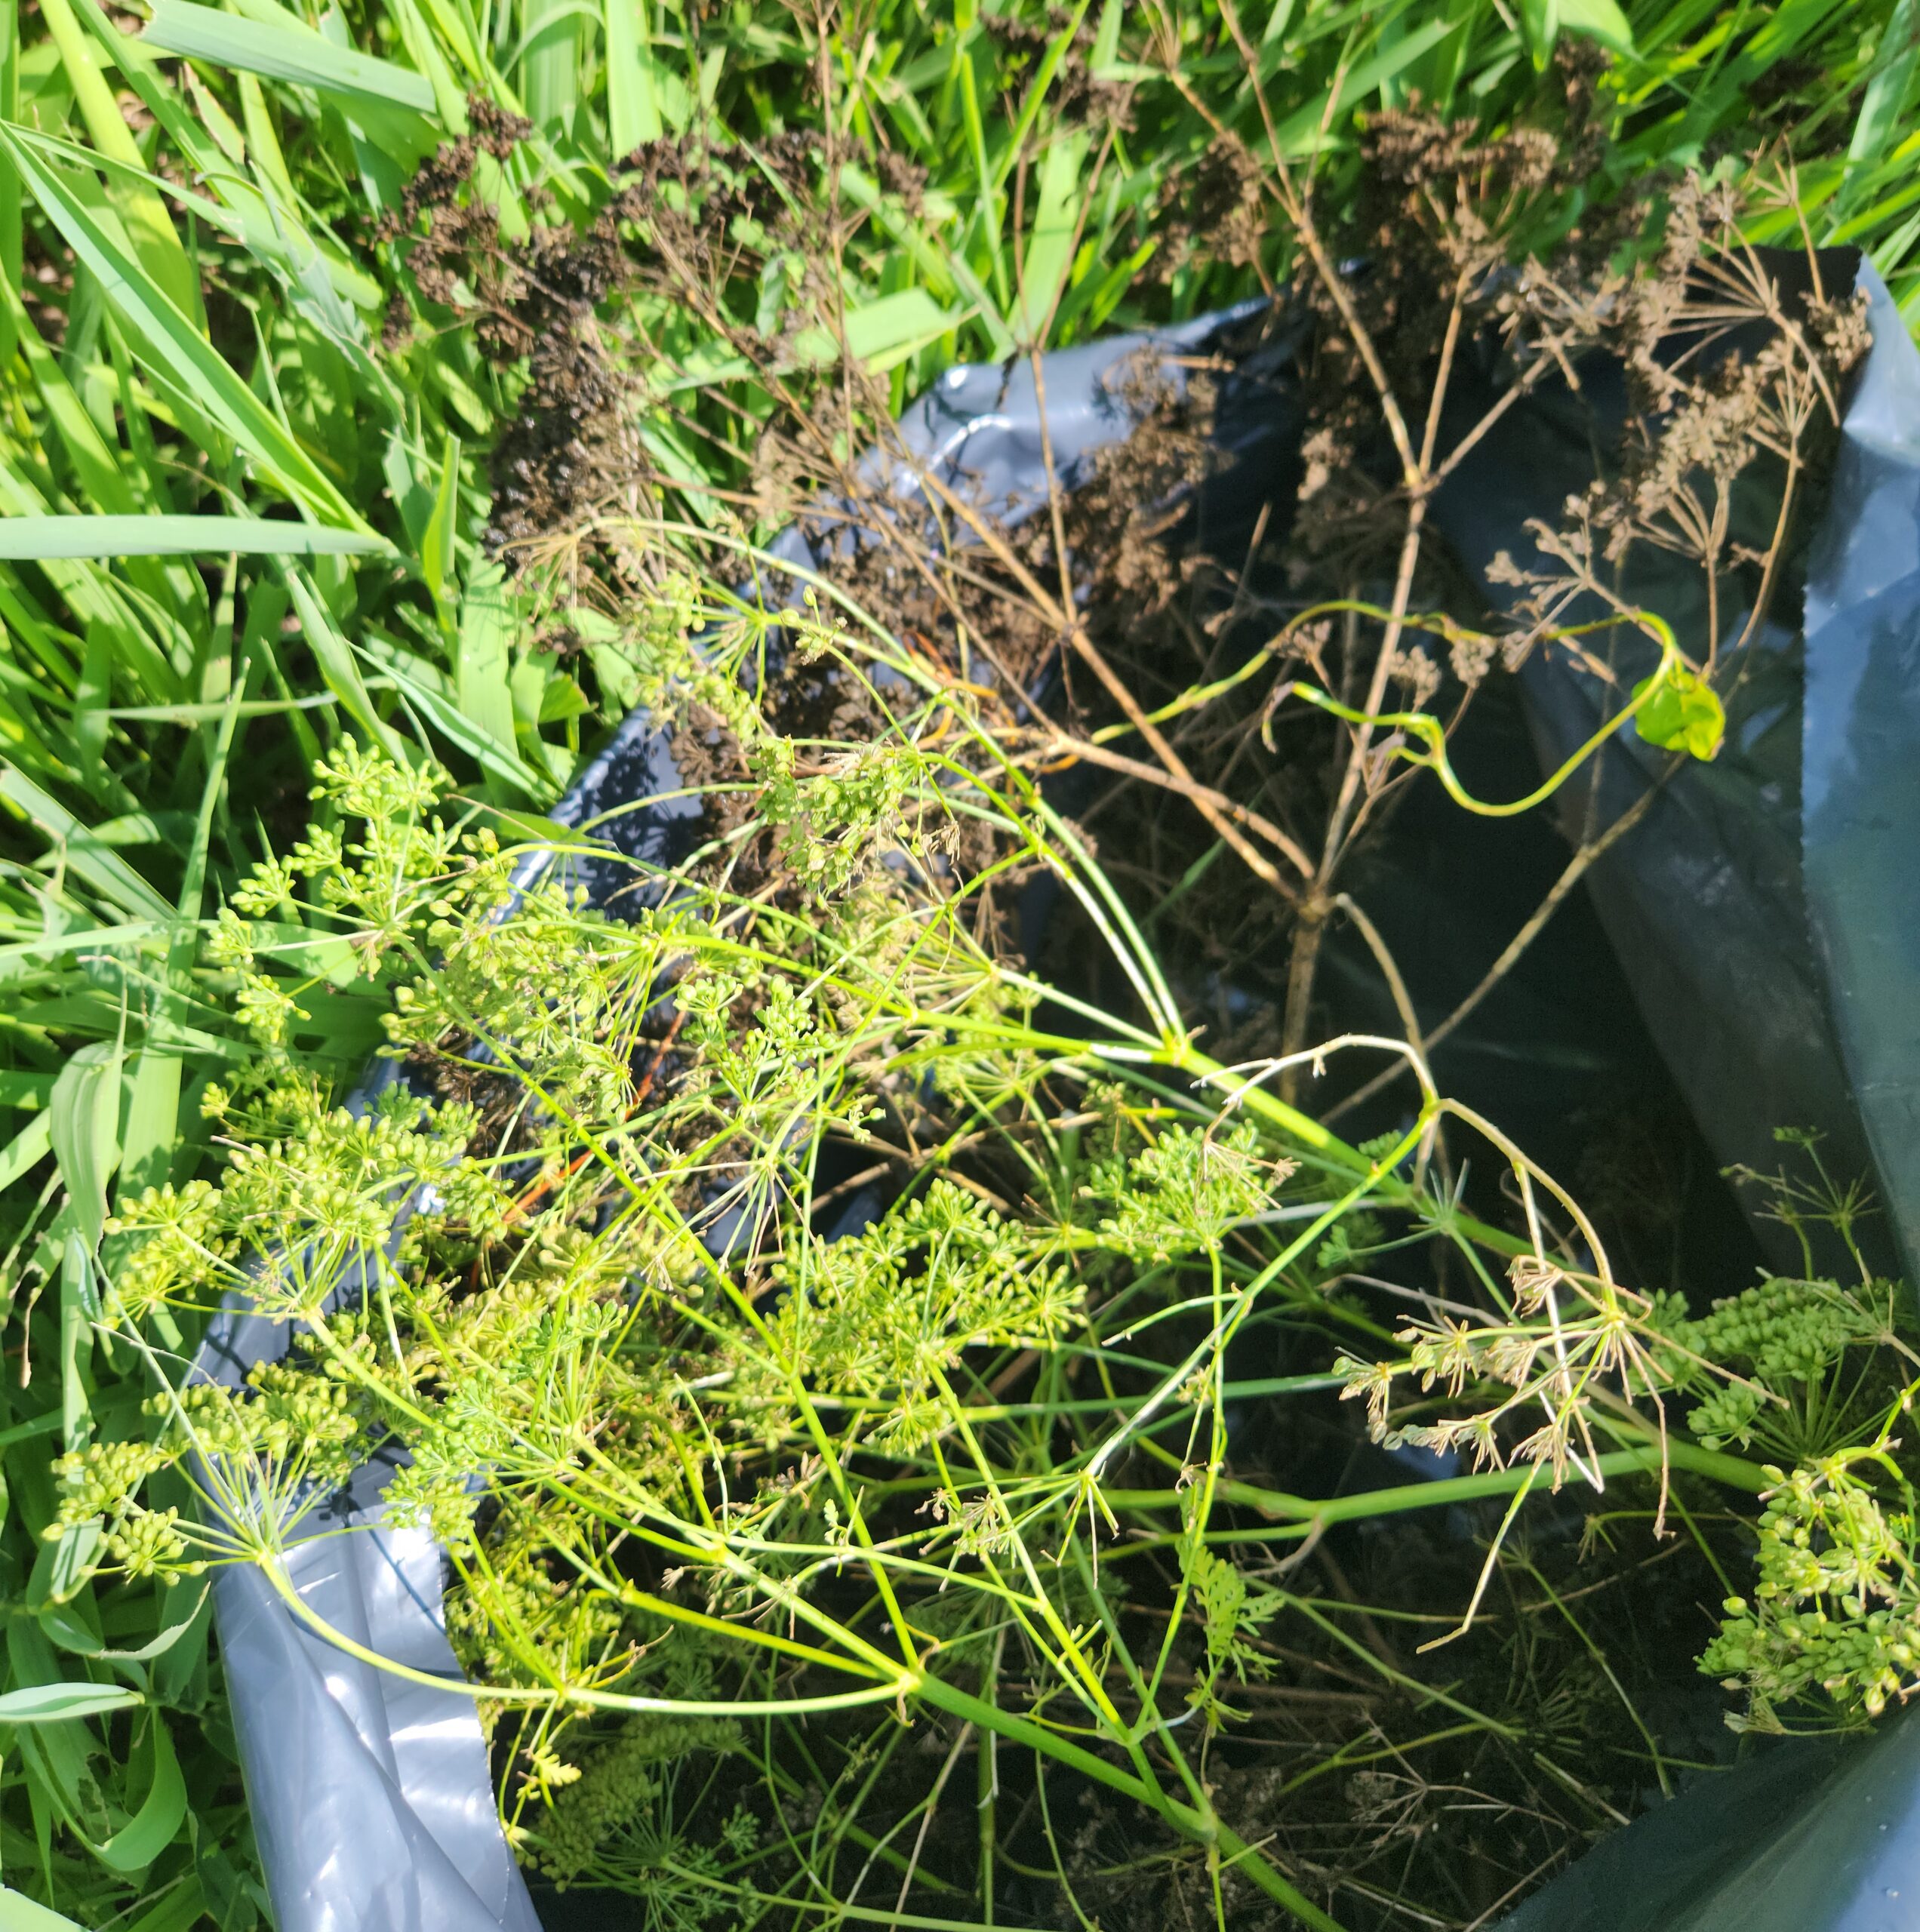
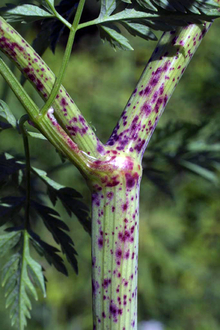
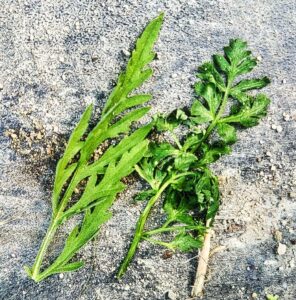
As its name implies, poison hemlock (conium maculatum) is a toxic plant. All parts of the plant, including the seeds, are poisonous (and can be fatal) if ingested. This invasive weed is non-native to the United States and has a two -year life cycle. The first year, poison hemlock appears as a basal rosette, meaning the leaves form a circle near the ground. In its second year, poison hemlock branches and grows up to 10 feet tall, with light green stems with purple blotches. Stems are hollow. Taproots resemble a small white carrot, but are deadly if eaten. Leaves are compound and deeply divided with sharp points. Clusters of tiny white flowers appear in late spring to summer (May to August, depending on the climate). Once the plant produces seeds, it dies. However, dead hemlock can remain toxic for up to three years.
Poison hemlock prefers moist soil, and thus is often found in marshes, near rivers, or in ditches. It also can quickly populate in disturbed soil, such as cleared forests. This biennial is a prolific producer of seeds. Its seeds easily disburse through water and via wildlife and may remain viable for five years.
How to Kill Poison Hemlock
Small Plants
Poison hemlock seedlings can be removed by hand (while wearing gloves), if found while small. Moisten the soil to more easily remove the entire taproot, or use a shovel to dig out. Place the plant in a plastic bag in the trash to protect waste management workers.
If found in the first year, poison hemlock can be killed with a broad-spectrum herbicide. However, this strategy kills ALL plants, so it is not recommended for a large area. Additionally, herbicide does not prevent seeds from germinating, so application will likely need to be repeated the next year (and possibly in additional years, due to the lifespan of hemlock seeds).
If found while short enough to mow, (typically also in the first year) poison hemlock can be weakened by mowing it repeatedly.
Large Plants
If found in the second year, but before the plant has flowered, poison hemlock can be killed with a broad-spectrum herbicide. As noted above, this strategy kills all plants and does not prevent seeds already in the ground from germinating. However, this strategy WILL prevent the formation of seeds on the second-year plants (and will also kill any first-year plants sprayed).
If found in the second year, but before the plant has flowered, poison hemlock can be dug up with a shovel (while wearing gloves), taking care to remove the entire taproot. The whole plant should be placed in a plastic bag in the trash to protect waste management workers.
If found during flowering, plants can still be manually dug up with a shovel (while wearing gloves); however, they will be quite large at this time. This strategy will not work well for a large infestation.
If found during flowering or after flowering, an easier manual removal strategy is to cut the flowers or seed heads off (while wearing gloves) and place them into a trash bag. Remove seeds on live and dead plants, as they remain viable for several years. Second year plants die after flowering, so there is no need to dig out the plant (unless you are worried about children/animals finding them, as plants can remain toxic for three years). Want additional details? Check out the University of Minnesota extension site here.

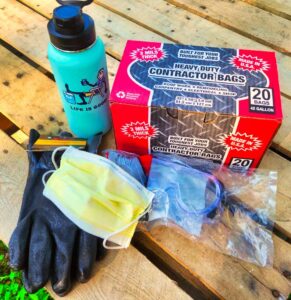
Supplies Needed for Manual Removal
As noted above, all parts of the poison hemlock plant are toxic. Oils from the plant can be absorbed through the cuts in the skin or mucous membranes. Thus, I recommend using the following protective equipment for manual removal of poison hemlock:
Long pants
A long-sleeved shirt
Long socks
Closed-toe shoes
Safety goggles
Facial mask
Additional needed supplies:
Pruning shears (to safely remove flowers/seed heads)
Thick contractor-style garbage bags (for safe removal/disposal)
Massacre Mistakes
My family purchased additional acreage this summer, which has already been a huge blessing. However, one morning while I was tending the pumpkin garden, I noticed an abundant grove of flowering poison hemlock near the river. Being the smart gardener I am, the next day I purchased the above supplies and set out to manually eradicate my hemlock grove. There was just one problem- the temperature was 100 degrees.
I hopped on my trusty riding lawn mower while dressed in long pants, long socks, long sleeves, and plastic gardening shoes. The weather felt a bit warm before I even made it to the river’s edge, but I was determined. I then donned a surgical mask, safety goggles, and plastic gloves before realizing that I had forgotten an important tool- my pruning shears.
Once back at the grove with proper tools, I got to work. The hemlock flowers towered above my head as I began sweating. Rather than simply cutting off the flowers or seed pods, I started cutting the stems around waist-height to help me access the hemlock plants closer to the river. The more hemlock I cut down, the more I found. I dragged branch after branch into a large pile near the mower.
By the time I had cut about ¾ of the hemlock, the heat felt oppressive. I pushed through and took down a few more plants. Sweat had filled my goggles to the point where my vision was obscured, so I took this as a sign that I should stop. I didn’t figure that passing out in a hemlock grove would be a good life choice, so I left the hemlock pile and went back to the house to immediately shower and wash my clothing.
More Massacre Mistakes
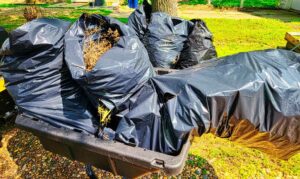
Over the next few weeks, I focused on moving and work projects. The hemlock was momentarily forgotten. Nearly 3 weeks later, once the weather had cooled down to the 80’s, I vowed to complete the task. I had a bit of hemlock to cut, and lots of hemlock to bag and dispose. At this time, I realized that cutting large branches had been a mistake, as they did not fit well into the contractor-sized trash bags. I also realized that waiting to bag the hemlock had been a mistake. Many of what I thought had been flowers now were seed pods, which released some seeds as I worked to place them in the trash bags. Were these seeds viable? Only time will tell.
This was not the end to my mistakes, however. I overfilled the bags, making them difficult to close securely. These bags opened during transportation in the mower cart, and likely dropped seeds on the way to the trash. Only two bags fit in my trash bin, so I leaned the others against a large tree. That night, the bags blew around in a storm and opened, likely spreading seeds even more. Oops.
I am certain my efforts were worth SOMETHING. I probably disposed of more seeds than I dropped. If nothing else, now I know where to search for hemlock next year. In the spring, I can mow these spots to weaken the plants prior to digging up. I also learned that hemlock can be removed safely, by wearing the right protective clothing.
Hemlock Removal Update
My efforts were not in vain. This year I have dug up a few second-year hemlock plants near the river, but not nearly as many as last year. However, the seeds are ridiculously viable, and I have found many first-year sprouts nearby last year’s bag spill. Fortunately the small sprouts are easy to spray or dig; I just have to keep my eye out. Maybe next year our land will be (at least mostly) hemlock-free!
Hemlock Removal Tips
Interested in removing hemlock in your own yard? Here are my top removal tips:
- Look at the weather forecast prior to starting. You will want to wear long protective clothing, so removing large patches of hemlock in hot weather is not recommended.
- Have all supplies ready prior to beginning the task. You don’t want to compromise safety or accidentally help the hemlock spread.
- If removing in the spring or summer, only cut the flowers and seed heads. The stems are large and will make disposal much more difficult.
- Only cut what you will be able to place in bags immediately. Otherwise, seeds may form and/or dry in seed heads and spread when you return for disposal.
- Securely fasten trash bags. Don’t risk seed dispersal in other parts of your yard. You also want to protect others from the contents of the bags, especially if you live with or near children or pets.
Have any experiences with poison hemlock removal? Share in the comments below!
Want to kill some non-toxic weeds? Check out this post on why you need a backpack flamethrower for weeding.
Rather skip the weeding, but love fresh vegetables? Although we won’t be at the Orange City, IA farmer’s market on Saturdays this summer (2025), we sell extra produce at our road market stand in Alton. Feel free to reach out if you’re looking for anything in particular! Email us at [email protected].